
Editorial • guide
SteamCMD Setup Guide: Download, Install, and Use It for Game Servers
Learn how to download SteamCMD, install it on Windows, and use it to install or update dedicated game servers with simple commands.
What is SteamCMD?
SteamCMD is Valve's command-line version of the Steam client. Its main purpose is installing and updating dedicated servers that use SteamPipe.
If you want to run game servers without depending on the full Steam desktop app, automate updates, or manage multiple servers more easily, SteamCMD is usually the right tool.
This guide focuses on the official basics from Valve's documentation, especially for Windows, which is the most common setup for private and hosted game servers.
Step 1: Download SteamCMD
The Windows version of SteamCMD is distributed as a ZIP archive.
Official download: SteamCMD for Windows
Create a folder for SteamCMD to run from, such as D:\steamcmd. This folder will remain fairly small and only contain SteamCMD.
Then extract the SteamCMD ZIP contents into the folder you just created, EG: D:\steamcmd.
Important note
Do not extract SteamCMD into an existing Steam client folder. Keep it in its own dedicated directory.
Done!
You now have SteramCMD ready to run. If you were following a game server setup guide, you can return to it and continue following the steps.
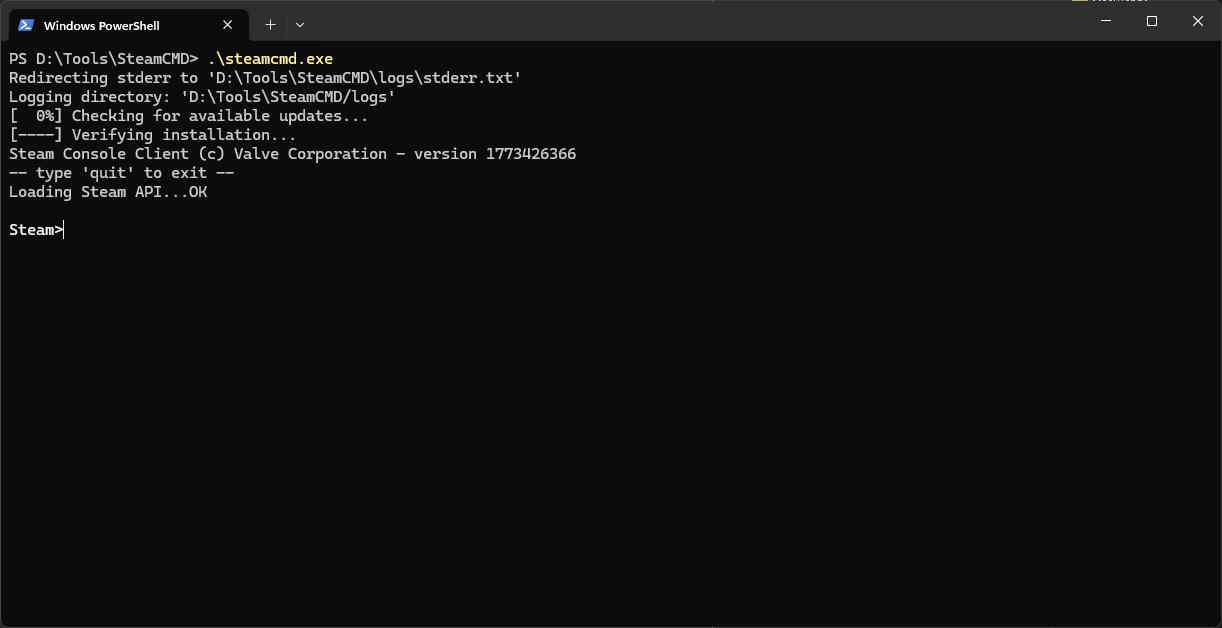
Manual Setup: Run SteamCMD for the first time
Open Command Prompt, change into your SteamCMD folder, and launch it.
On first launch, SteamCMD updates itself automatically and then drops you into the Steam> prompt. Valve's docs also note that you can type help once SteamCMD starts if you want to see more built-in commands.
Log in
For most dedicated server downloads, you can use:
login anonymous
Some servers require a real Steam account instead. In those cases, log in with your Steam username and password.
If a server requires ownership or account access, anonymous login will not be enough.
Install or update a server
The standard SteamCMD flow is:
- choose the install folder
- log in
- run
app_update <appid> - quit SteamCMD
This is the basic pattern behind most dedicated server install scripts.
If you want a game-specific example after this, see the Windrose server setup guide.
Basic SteamCMD commands
Replace the install folder and app ID with the server you actually want to install.
Command example
cd D:\steamcmd
steamcmd
login anonymous
force_install_dir D:\GameServers\MyServer
app_update 123456 validate
quit
Why the SteamCMD command uses +
SteamCMD lets you chain multiple commands together in one line by prefixing each command with +. This is what makes batch files so useful for server setup and updates.
For example, a batch file can tell SteamCMD to:
- set the install folder with
+force_install_dir - log in with
+login anonymous - install or update the server with
+app_update - exit cleanly with
+quit
That means you can run one batch file and have SteamCMD perform the full update process in the correct order without typing each command manually.
SteamCMD reads these + commands from left to right, so the order matters. You usually want to set the install directory before running app_update, and end with +quit so the script closes properly.
steamcmd.exe +force_install_dir D:\GameServers\Windrose +login anonymous +app_update 4129620 +quit
At a glance
Common SteamCMD commands
These are the commands you will use most often when installing or updating dedicated servers with SteamCMD.
Command | What it does |
|---|---|
| Logs in anonymously for most public dedicated server downloads |
| Logs in with a Steam account when anonymous access is not supported |
| Sets the folder where the server files will be installed |
| Downloads or updates a server application by Steam app ID |
| Downloads or updates and also validates file integrity |
| Exits SteamCMD |
Linux note from Valve
Valve's official docs recommend running SteamCMD under a dedicated steam user on Linux rather than as root.
SteamCMD is a 32-bit binary, so some 64-bit Linux systems also require additional 32-bit libraries before it will run correctly.
When to use SteamCMD
SteamCMD is best when you want to:
- install dedicated servers without the full Steam desktop app
- automate updates with batch files or scripts
- host multiple game servers from one machine
- build repeatable update workflows for your community
If you are following another Server Vote guide, you will usually see SteamCMD used inside a batch script with force_install_dir, login anonymous, and app_update.
That is the standard pattern for server installation and maintenance.
Official reference
Valve's official SteamCMD documentation:
FAQ
Common questions
What is Steam Client WebHelper?
Steam Client WebHelper is an important part of the regular Steam desktop app. It uses the Chromium Embedded Framework (CEF) to display all the web-based parts of Steam, including the Store, Community pages, in-game overlay, and chat windows.
Since Steam’s entire interface basically runs as an embedded web browser, you’ll often see multiple WebHelper processes running in the background. Each one handles different tabs or features.
It’s essential if you want the full Steam experience with its graphical interface, but it can use quite a bit of RAM and CPU.
What is SteamDB?
SteamDB is a popular third-party website that provides detailed information about Steam games, apps, DLC, and updates. It shows pricing history, player counts, hidden data from the Steam store, and release information that isn’t easily visible in the official Steam client.
It’s widely used by gamers, developers, and traders to track sales, find bargains, and monitor game popularity.
What is SteamDB used for?
People use SteamDB to:
Check historical prices and discounts
See current and peak player counts
View app IDs and technical details
Find unreleased games and upcoming updates
Research Steam market trends
It’s one of the best tools for serious Steam users who want more data than the official client provides.
How do I find my Steam ID?
Your Steam ID (or Steam64 ID) is a unique number tied to your Steam account. You can find it quickly on sites like SteamDB or by visiting your Steam profile and using tools like STEAMID I/O It’s commonly needed for joining private servers, using certain tools, or troubleshooting account issues.
What is the Steam Market?
The Steam Market is Steam’s official marketplace where users can buy and sell in-game items, trading cards, skins, and cosmetic goods. Most transactions use Steam Wallet funds, and Valve takes a small commission on every sale.
End of guide
Thanks for reading
If this SteamCMD guide helped, the next step is usually a game-specific setup guide. If you spot anything outdated, let us know so we can keep it accurate.
Article details
Author: Eps · Editorial Team
Published: 4/22/2026
Updated: 5/9/2026
Feedback
Spotted a problem, outdated step, or missing command? Let us know and we will keep this guide accurate.
Rate this guide
Hover the stars to rate this article. Your rating is saved to your account for this page.
5.0 / 5 from 1 rating
Click a star to leave a rating.